


SVDA is a Windows programs that allows the capture of video and collection of analog data in synchronization. SVDA eliminates the need to re-synchronize video and data collected on different systems. The video can be captured into to any video file format using any codec (compression/decompression module) supported by Windows (such as MPEG1, MPEG2, DV, DivX). Analog data is captured using a data acquisition card and stored in the MVTA Data file format (BDF) that can be read by MVTA version 2.90 or later. By using MVTA (v2.90 or later) the video and data can be display simultaneously in synchronization allowing easy exploration of relationships between the data and video.
| Windows 95/98/ME/NT/2000/XP with its recommended memory requirement. | |
| DirectX 7 to DirectX 9 (DirectX 9 recommended). | |
| Analog or digital video sources like Firewire (IEEE1394) DV cameras, DV camcorders, USB web cams, PCI TV cards, PCI composite capture cards, USB TV devices that uses WDM or VFW device drivers. | |
| National Instrument supported data acquisition card and its associated drivers | |
| Hard drive large enough to hold the video and data files to be collected. |
The maximum video capture frame rate is influence by the video capture device, the CPU and hard drive speed. The minimum computer requirements are:
| Pentium III 800 Mhz | |
| 7200 rpm or higher hard drives |
![]()
Double-click on the SVDA icon to run the program. The About dialog box will be displayed first and then the main window (See below). The start-up main window shows the menu bar on the top, the command bar at the bottom and the Data Collection panel in the middle section. The Data Collection panel contains the signal waveform display window and the Channel Display List. The Channel Display List defaults to 8 inputs, each represented by a different color.
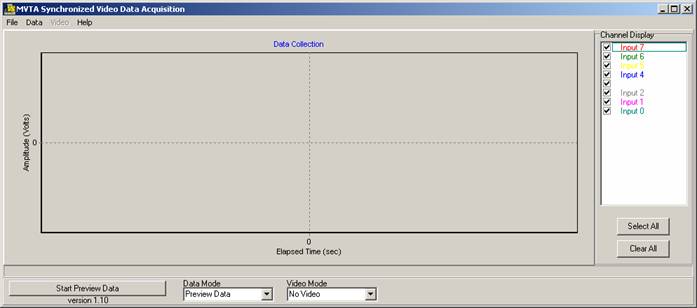
The Command Bar section contains the command button, and the Data and Video Mode selection boxes. The Data Mode choices are "No Data", "Preview Data", and "Record Data". The Video Mode choices are "No Video", "Preview Video", and "Record Video". The caption in the command button will changed based on the selections in the Data and Video Mode boxes.. The Data and Video Mode selection also controls the display of the Data Collection and Video Capture Panels. When the modes are set to either "Preview" or "Record", the panels are displayed. The default is the Data Mode set to "Preview Data" and Video Mode set to "No Video", so the only Data Collection Panels is visible.
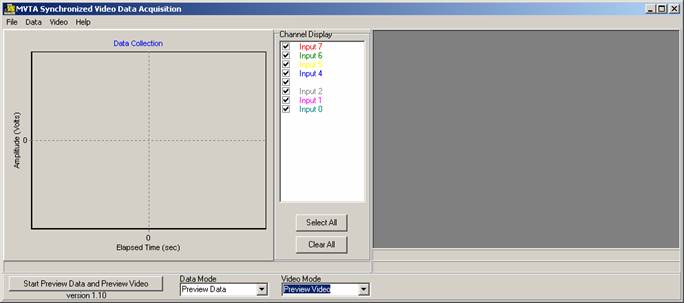
Setting the Video Mode to "Preview Video" will display the Video Capture panel and updates the command button to "Start Preview Data and Preview Video". Status message boxes are located at the bottoms of each panel. In preview mode, the signal waveforms and the video are displayed in their respective panels using the current settings in the Video settings and Data Acquisition Settings dialog boxes. In record mode, the signal waveform and video are also recorded into files on the hard drive using the filename prefixes entered in the Save Data command in the File menu. Both Video and Data file will have the same filename but with different extensions. The Data file extension will always be BDF but the Video file extension will be determined by the video file format and codec selected in the Video Setting dialog (typical AVI or MPG). The filenames will be formed from filename prefix plus the Date and Time.
Use Preview mode to check if current settings are proper for data and video collection. Click on the Command Button to start the preview. Click on the command button again to stop the preview. Preview will go on infinitely until Stop is clicked. Select the Video or Data Menu to display the settings dialogs to make can changes to the settings. See the appropriate sections in the Menu Reference section for explanation of changing the Video Settings and Data Acquisition Settings.
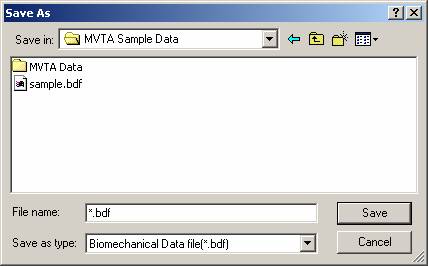
If the settings are fine, change the Video and Data modes to Record. To set the filename for the record files, select the Save As option from the File Menu. You will be asked to enter the filename. You are actually entering a filename prefix.. The filename prefix is used as the first part of the filename with the rest of the filename being formed from the date and time when the files are created. Click the command button to start recording. Recording will continue until the stop button is clicked or the hard drive runs out of space. Once the Data and Video file are recorded, use the MVTA program to load and view them.
See section Program Usage for description of the main windows
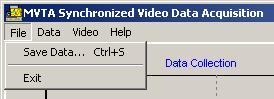
This option allows you to enter the filename prefix to save your data and video files. Data is saved during the recording mode and not at the time the filename is entered. The filename prefix is used to create the filename to use for the data and video files. The filename is composed of the <filename prefix> + <Date-Time>+<File Extension>. The Data file extension will always be BDF but the Video file extension will be determined by the video file format and codec selected in the Video Setting dialog (typical AVI or MPG).
Exits the SVDA program.
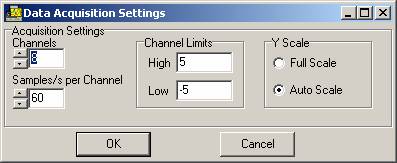
This dialog allow you to change the data acquisition parameters: the numbers of channels, the sample rate, channel limits (input range), and amplitude scale of the display.
The number of channels and sample rate are changed incrementally by clicking of the up/down arrows or directly by entering the value in the input box. The actual values supported are determined by the data acquisition hardware installed. The sample rate should be an integer multiple of 60 is maintain data synchronization with the video.
The Channel Limits set the maximum input range of the signal. The maximum range is determined by the data acquisition hardware. The high and low channel limits are used to set the internal gain for the data acquisition hardware to improve the sampling resolution. The channel limits are also used for displaying the range of the signal when then Y scale is set to "Full Scale". When the Y Scale is set to "Auto Scale", the display is automatically determined by the currently displayed minimum and maximum values of the signal. The scaling constantly changes so the data in current time frame is always displayed.
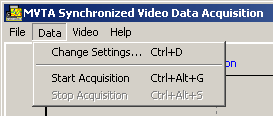
Select this option to start the data acquisition in both the preview and record mode. The option is disabled when the program is already in the acquisition state.
Select this option to stop the data acquisition in both the preview and record mode. The option is disabled when the program is already in the stop state.
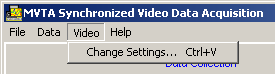
This dialog allows the changing of the video and audio capture parameters of the capture device. This dialog gives you access to the majority of the parameters of your capture device. Please refer to your video capture device manual for the function and meaning of the parameters. The parameters available for change will vary with the capture device. The options that are grayed-out are not available. Improper settings can seriously degrade the capture performance. Experimentation will be required to determine the best settings. Capture performance is displayed in the status bar at the bottom o the display panels during the recording mode.
Currently on-line help is not available.
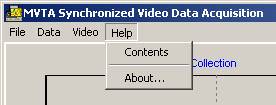
Displays the About dialog for the program
Last Updated: 2/25/2005
Webmaster: mvta@engr.wisc.edu